Pi hole is a network wide ad blocker. It works by setting itself up as a DNS (Domain Name System). The article walkthrough on installing pi hole on a Raspberry Pi however it can be installed on any computer or run as a Docker container.
Note: Pi hole cannot block all ads e.g. It cannot block youtube ads as the ads are served from the same domain as the content.
Further reading: what is dns and tools to query dns records
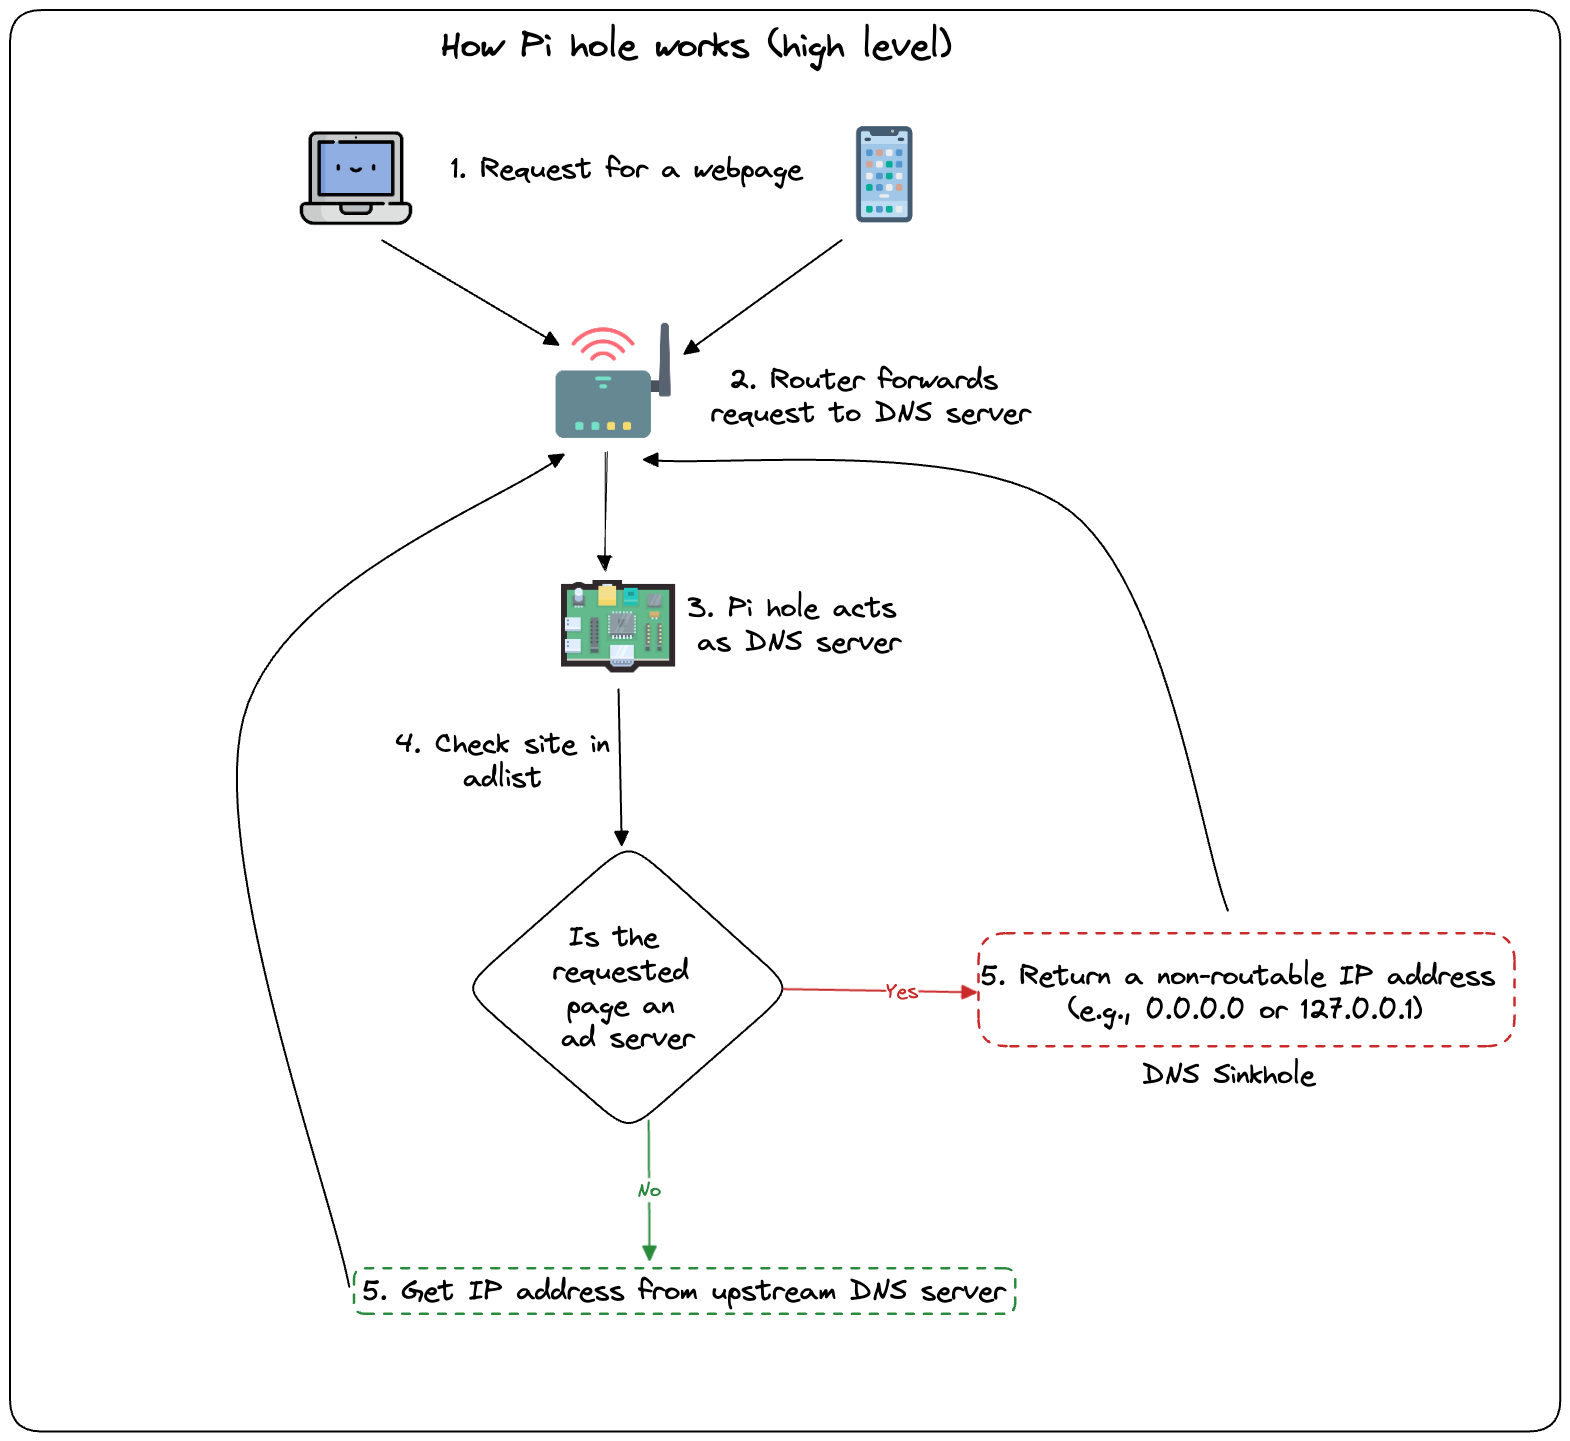
How it works
Pi hole works by checking the url requested is in adlist or not.
- Enter a website on computer or phone
- The router sends the request to DNS server (which is Pi hole)
- Pi hole checks if the requested page is in adlist. If yes it sends a non routable IP address this is called a DNS Sinkhole.
- If address is valid the request page is loaded on your device
Setting up a raspberry pi
Any raspberry pi would do as pi hole is not resource heavy. I would recommend anything above pi zero
- Download Raspberry Pi Imager
- Start the application and select your pi device and for OS select
RASPBERRY PI OS LITE(64 BIT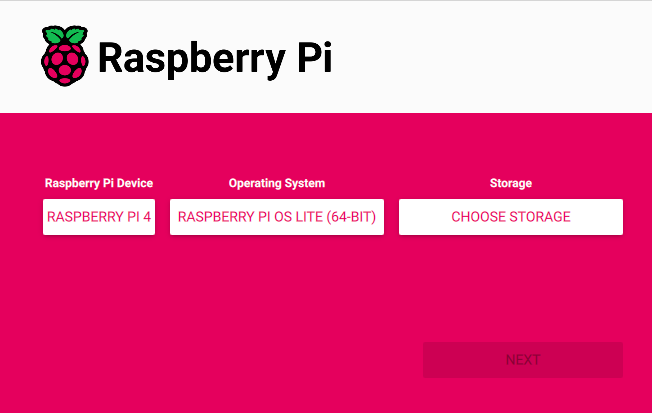
- In
NEXToption is selectedEDIT SETTINGS- In
GENERALset hostname, username and password - Don’t select wifi as it is recommended to use pihole with ethernet
- In
SERVICEScheckEnable SSH
- In
- Put in the SD card in Raspberry Pi and boot it
- To know the ip address run the below command. replace hostname with the hostname you entered.
ping <hostname>.local
- Now with the ip address we can ssh into the device using below command replace with username and ip address.
ssh <username>@<ip_address>
- Enter the password and accept the fingerprint prompt
Your raspberry pi is now setup to install pi hole
Setting up pi hole on raspberry pi
Once you are connected to your raspberry pi via ssh
- Run the below command to install
curl -sSL https://install.pi-hole.net | bash
- Press
okfor the prompt. Select default value. - Press
yesfor installing admin website and web interface - Enable query logging
- Note down the ip address and credentials for the web interface
To check if install is correct we can use dig command. The 127.0.0.1 points to the pi hole (i.e. device itself)
dig @127.0.0.1 google.com +short
- login to admin dashboard the URL would be as below. Replace the ip address with yours and bookmark the page for future reference.
http://<ip_address>/admin/login.php
Add pi hole ip address as DNS server on router
- Get the ip address of pi hole server using below command
hostname -I | cut -d' ' -f1
- Login to your router
- goto Settings and enable static ip for the pihole ip address (this ensure that on restart the same IP is given out by your router)
- goto DHCP server setting enter the ip address of the pi hole server as the DNS server
Note: Setting change based on router but each router should have an option to enable static ip and to update the DNS ip address
Adding more block lists
By default pi hole comes with a limited set of urls to block. This can be updated with firebog.net contains a huge set of list of verified block list
- Login to the web interface of pi hole
- Goto
Adlistsand paste the ticked list in Address bar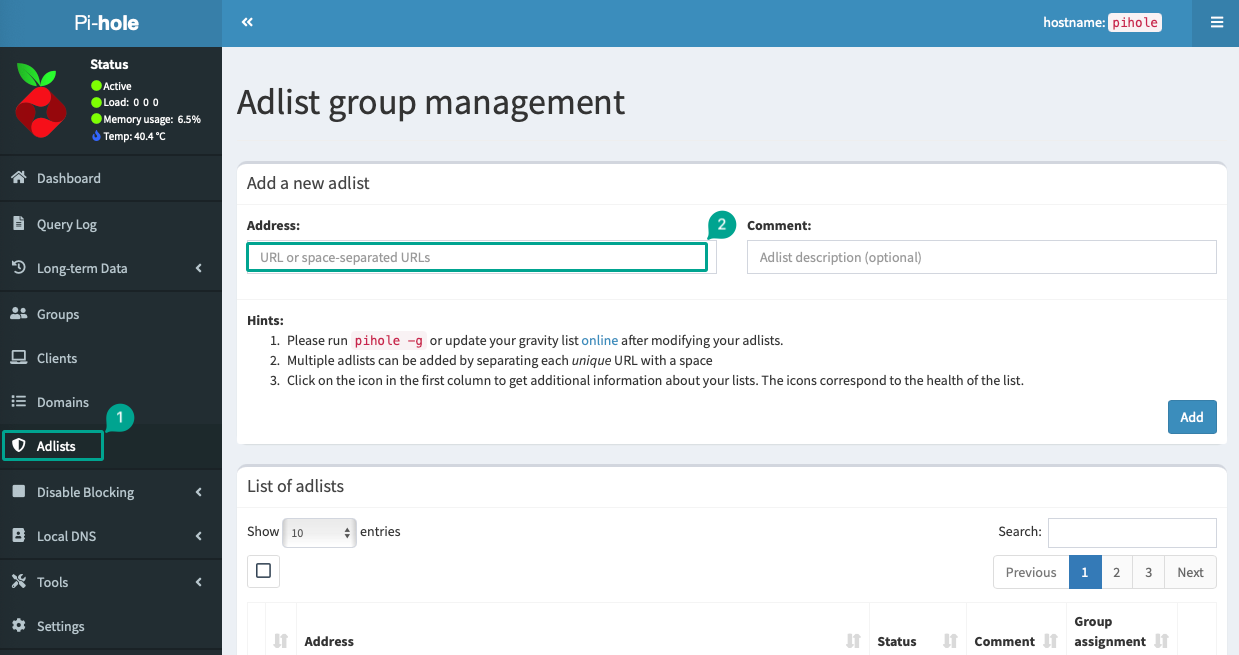
- To update this list Goto
Tool>Update Gravity
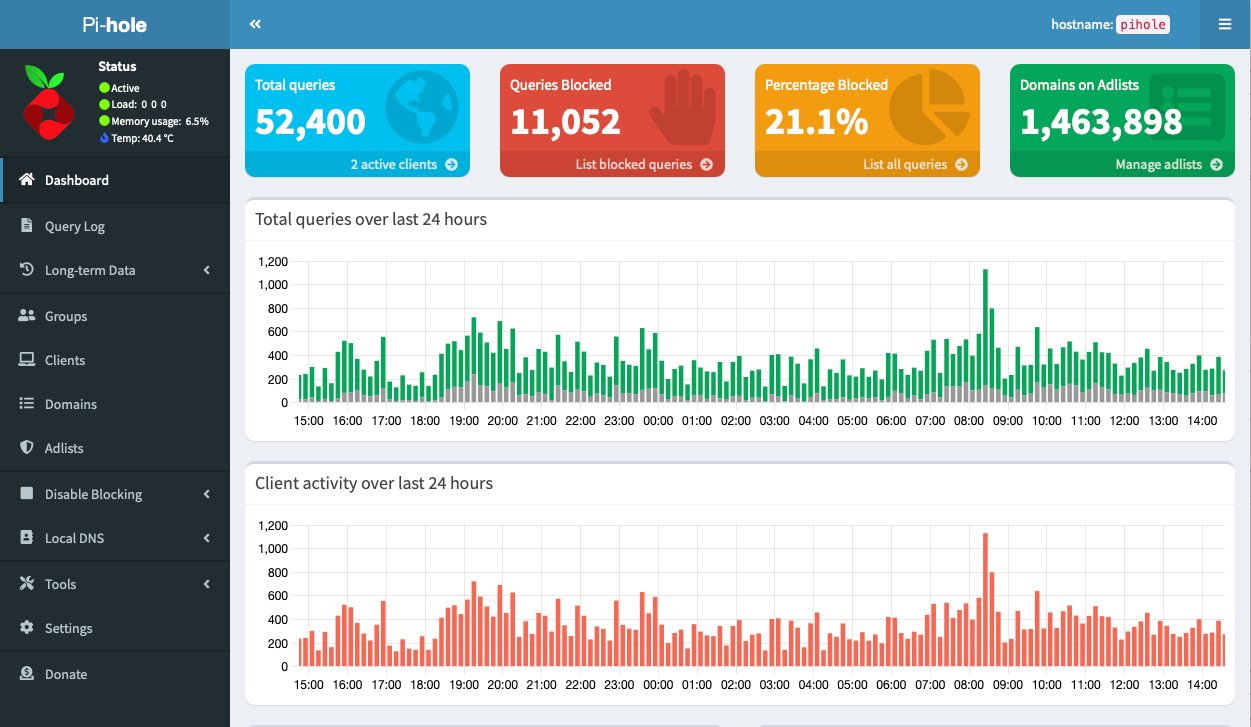
This is my pi hole with 1.4M domain in ad list.
Install Unbound - Network wide secure DNS
Unbound is a recursive caching DNS resolver and is designed to be even more secure by supporting DNS over TLS and DNS over HTTPS enabling to maintain privacy.
Further reading: bartonbytes unbound
To install unbound follow the below steps.
- SSH into pihole server and run the below command
sudo apt install -y unbound dnsutils
sudo wget https://bartonbytes.com/pihole.txt -O /etc/unbound/unbound.conf.d/pihole.conf
- To ensure the latest file is picked up and to have unbound start on restart run the below two commands
sudo systemctl restart unbound
sudo systemctl enable unbound
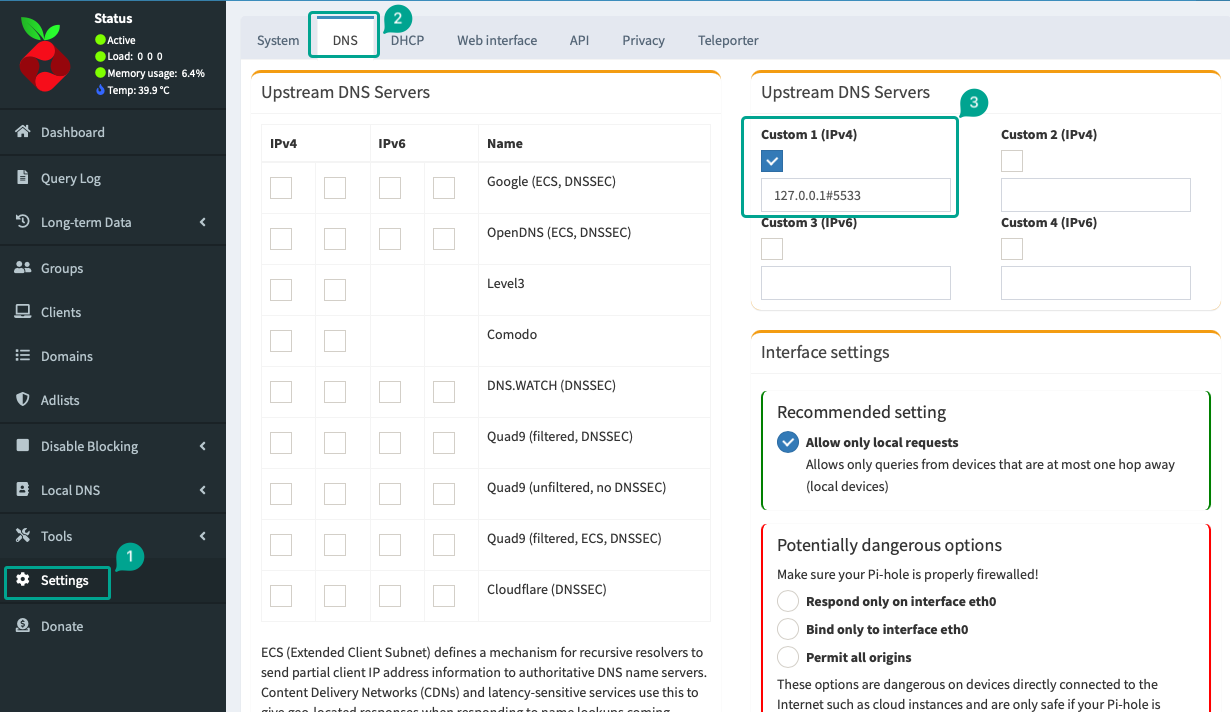
- Uncheck prior upstream DNS server in pihole admin and update Custom 1 IPv4 to
127.0.0.1#5533
Updating pi hole to latest version
- SSH into your raspberry pi
- Run the below commands
sudo apt update && sudo apt upgrade -y
pihole -up
Further reading: use ssh keys to login to remote servers